Introduction: Miniature CRT Dali Clock With ESP32 Composite Out!


Hello fellow makers,
I recently purchased a box full of old film cameras from a local garage sale. Within the box was a broken old Panasonic RX22 VHS video camera, I considered just throwing it out as I have no use for it but luckily my inner tinkerer wanted to first take it apart and have a look at how it works.
Boy was I glad I did!
I had no idea these old camcorders had a CRT electronic viewfinder neatly enclosed on its own and better yet they don't require anything special to drive simply a single composite input and low voltage power supply.
Now whilst looking for something to use the display with I came across an awesome retro Dali clock project that runs on a ESP32 that outputs composite video to NTSC/PAL televisions, the time and date is set automatically over WIFI and as an added bonus it has an awesome Miami Vice styling that will fit in perfectly with what I have in mind for the design!
If you enjoy my Instructables and would like to support my future projects you can Buy Me A Coffee.
Step 1: What You Will Need:
To make your own you will need the following:
- An old camcorder or simply the viewfinder
- ESP32
Amazon - ESP-32S Development Board
- Access to a 3D printer
Amazon - Creality 8K Resin 3D Printer HALOT-MAGE PRO
- Magnifying lens
Amazon - 30mm Diameter Optical Glass Convex Lens
- Chrome marker
Amazon - Liquid Mirror Chrome Metallic Markers
- Clear resin
Amazon - 3D Printer Resin, Clear
- Clear Lacquer
Amazon - Rust-Oleum 334029 Painter's Touch 2X Ultra Cover Spray Paint
*As an Amazon Associate I receive a small percentage from sales made through provided links at no cost to you, this helps fund future projects.
Step 2: The Dali Clock:
Dali Clock is a digital clock. When a digit changes, it "melts" into its new shape.
The original version was written in 1979 by Steve Capps for the Xerox Alto workstation. In 1984, he ported it to the original Macintosh 128K. He says that his inspiration was the morphing effect seen in the 1974 short film La Faim by Peter Foldes, one of the first computer-generated key-frame animations.
In 1991, I (Jamie Zawinski) re-implemented Dali Clock from scratch for X Windows on Unix. It's been fairly popular there ever since.
Step 3: Sourcing the CRT:
N.B. - The viewfinder PCB contains high voltage circuitry, make sure to properly discharge the capacitors before handling and do not switch it on while working with it!
You should be able to find these CRT electronic viewfinders in most VHS era camcorders but as the way they are driven may differ I will compile a list of camcorders that have suitable EVF as I discover them.
As the EVF and driving circuitry is housed separately in the adjustable "neck" of the camcorder there is no need to save any electrical components from the camcorder itself, you can simply separate the EVF and unplug it from the mainboard making sure to keep its wiring.
I also kept the lenses from the camcorder as they are high quality and most have UV and anti-reflective coatings on, I ended up using the largest one as the lens for the screen in this project.
Step 4: Coding the ESP32:
To keep things simple we will be using the Arduino IDE to code our ESP32, unfortunately I've come across a lot of problems when code is written on different versions of the IDE and builds of the boards. When I started with this project I had the problem that as soon as the ESP32 starts its AP it would reboot, so bellow is how I managed to get everything working correctly.
- Install Arduino IDE onto your system. ( I have version 1.8.19 )
- In your Arduino IDE, go to File> Preferences
- Enter the following into the “Additional Board Manager URLs” field:
https://raw.githubusercontent.com/espressif/arduino-esp32/gh-pages/package_esp32_index.json
- Then, click the “OK” button.
- Open the Boards Manager. Go to Tools > Board > Boards Manager
- Search for ESP32, select version 1.0.6 from the dropdown list and press the install button for the “ESP32 by Espressif Systems"
- It will take a few seconds to install and then you can close the board manager.
- You should now be able to select your ESP32 device under the "board" submenu.
That's it with the ESP32 selected you can copy the code bellow and compile it to the board.
Step 5: The Code:
/****************************************************************************
 * DaliClock by (c) 2021 Marcio Teixeira         *
 *                   *
 * This program is free software: you can redistribute it and/or modify *
 * it under the terms of the GNU General Public License as published by *
 * the Free Software Foundation, either version 3 of the License, or  *
 * (at your option) any later version.         *
 *                   *
 * This program is distributed in the hope that it will be useful,  *
 * but WITHOUT ANY WARRANTY; without even the implied warranty of   *
 * MERCHANTABILITY or FITNESS FOR A PARTICULAR PURPOSE. See the   *
 * GNU General Public License for more details.       *
 *                   *
 * To view a copy of the GNU General Public License, go to the following *
 * location: <http://www.gnu.org/licenses/>.        *
 ****************************************************************************/
// Note by NEWY - use esp32 tool chain v1.0.6
#define SUPPORT_NTSC 1
#define SUPPORT_PAL 1

// Pin used for toggling touch mode
#define CALENDAR_TOUCH_GPIO 4

#include <SPIFFS.h>
#include <WiFi.h>
#include <WebServer.h>
#include <DNSServer.h>

#include "time.h"
#include "src/time_zones.h"

#include "esp_pm.h"

#define USE_ATARI_COLORS

#include "src/gfx/CompositeGraphics.h"
#include "src/gfx/CompositeColorOutput.h"
#include "src/gfx/Font.h"
#include "src/gfx/font6x8.h"

#include "src/dali_constants.h"
#include "src/dali_config.h"
#include "src/dali_color_theme.h"
#include "src/dali_digit.h"
#include "src/dali_clock.h"
#include "src/dali_grid.h"
#include "src/dali_city.h"
#include "src/dali_horizon.h"
#include "src/dali_sun.h"
#include "src/dali_sparkle.h"
#include "src/dali_stars.h"
#include "src/dali_status.h"

//Graphics using the fixed resolution for the color graphics
CompositeGraphics graphics(CompositeColorOutput::XRES, CompositeColorOutput::YRES);
//Composite output using the desired mode (PAL/NTSC) and a fixed resolution
CompositeColorOutput composite(CompositeColorOutput::NTSC);

Font<CompositeGraphics> font(6, 8, font6x8::pixels);

DaliConfig config;
DaliStatus info;
DaliClock dali(config);
DaliStars stars;
DaliHorizon horizon;
DaliSun sun;
DaliGrid grid;
DaliCity city;
DaliSparkle sparkle[num_sparkles];
DaliColorTheme theme;

WebServer server(80);
DNSServer dnsServer;

#include <soc/rtc.h>

void setup() {
 //highest clockspeed needed
 esp_pm_lock_handle_t powerManagementLock;
 esp_pm_lock_create(ESP_PM_CPU_FREQ_MAX, 0, "compositeCorePerformanceLock", &powerManagementLock);
 esp_pm_lock_acquire(powerManagementLock);

 Serial.begin(115200);

 wifi_start();
 dali.set_time(12, 59, 0);

 //initializing graphics double buffer
 composite.init();
 graphics.init();
 graphics.setFont(font);
}

void draw() {
 const uint32_t ms = millis();
 #define PERIOD(LENGTH,PHASE) float(uint32_t(ms - PHASE * 1000) % uint32_t(LENGTH * 1000)) / 1000
 const float period_1s = PERIOD(1,0.0);
 const float period_3s = PERIOD(3,0.0);
 const float period_7s = PERIOD(7,0.0);
 const float period_7s1p = PERIOD(7,0.5);

 //clearing background and starting to draw
 graphics.begin(background_color);

 info.draw(graphics);
 grid.draw(graphics, period_1s);
 stars.draw(graphics,period_7s);
 horizon.draw(graphics);
 sun.draw(graphics);
 city.draw(graphics);
 dali.draw(graphics);
 for(int i = 0; i < num_sparkles; i++) {
  sparkle[i].locate(graphics, period_7s1p - i * sparkle_phase, CLOCK_RECT);
 }
 dali.draw_gradient_and_shine(graphics, period_7s);
 for(int i = 0; i < num_sparkles; i++) {
  sparkle[i].draw(graphics, period_7s1p - i * sparkle_phase);
 }

 //finished drawing, swap back and front buffer to display it
 graphics.end();

 theme.update(dali.get_day_elapsed());
}

void loop() {
 draw();
 composite.sendFrameHalfResolution(&graphics.frame);
 delay(10);
 monitorTouch();
}

void monitorTouch() {
 static uint16_t smoothed;
 const uint16_t reading = touchRead(CALENDAR_TOUCH_GPIO);
 smoothed = (9 * smoothed + reading)/10;
 dali.set_calender_mode(reading < smoothed*0.8);
}


/********************************* WEB SERVER *********************************/
constexpr char *ap_ssid = "ESP32 Dali Clock";
constexpr uint32_t wifiTimeout = 10000;
constexpr const char * webpage = R"rawliteral(
<!DOCTYPE html>
<html lang="en">
 <head>
  <meta charset="utf-8">
  <title>ESP32 Dali Clock</title>
  <meta name="viewport" content="width=device-width, initial-scale=1">
  <style>
   body {width: max-content;}
   form div {display: flex; gap: 1em; margin: 0.5em 0;}
   label {flex-grow: 1}
   input:not([type = "submit"]), select {
    min-width: 20em;
    box-sizing: border-box;
   }
  </style>
  <script>
   // When the user selects a general location from the list,
   // repopulate it with more specific locations from the server
   async function onFilterChanged(el) {
    if(!el.value) return;
    tz = await fetch("timezones?prefix=" + el.value);
    tz = await tz.json();
    el.innerText = "";
    tz.forEach(x => {
     o = document.createElement("option");
     o.innerText = x;
     el.appendChild(o);
    })
    el.name = "timezone";
    el.removeAttribute("onchange");
   }
  </script>
 </head>
 <body>
  <h1>ESP32 Dali Clock</h1>
  <form action="/config_prefs" method="get">
   <h2>Clock Preferences</h2>
   <div><label for="theme_id">Color Theme:</label>
   <select id="theme_id" name="theme_id">
    <option value="99">Time-of-Day Blend</option>
    <option value="98">Minute Blend</option>
    <option value="0">Night Theme Only</option>
    <option value="1">Dawn Theme Only</option>
    <option value="2">Day Theme Only</option>
    <option value="3">Dusk Theme Only</option>
   </select></div>
   <br>
   <input type="submit" value="Submit">
  </form>
  <form action="/config_time" method="get">
   <h2>Manual Time Selection</h2>
   <div><label for="datetime-local">Time:</label>
   <input type="datetime-local" id="datetime-local" name="datetime-local" step="1"></div>
   </div>
   <div><label for="mil_time">Show 24-hour clock:</label>
   <input type="checkbox" id="mil_time" name="mil_time" checked></div>
   <br>
   <input type="submit" value="Submit">
  </form>
  <form action="/config_wifi" method="get">
   <h2>Network Configuration</h2>
   <div><label for="net_ssid">Network Name:</label>
   <input type="text" id="net_ssid" name="net_ssid" placeholder="Leave blank for AP mode"></div>
   <div><label for="net_pass">Network Password:</label>
   <input type="text" id="net_pass" name="net_pass"></div>
   <br>
   <div><label for="ntp_addr">Time Server:</label>
   <input type="text" id="ntp_addr" name="ntp_addr" value="pool.ntp.org"></div>
   <div><label for="location">Location:</label>
   <select id="location" >
    <option value="">-- none selected --</option>
    <option>Africa</option>
    <option>America</option>
    <option>Asia</option>
    <option>Antartica</option>
    <option>Arctic</option>
    <option>Asia</option>
    <option>Atlantic</option>
    <option>Australia</option>
    <option>Etc</option>
    <option>Europe</option>
    <option>Indian</option>
    <option>Pacific</option>
   </select></div>
   <br>
   <input type="submit" value="Submit">
  </form>
 </body>
</html>
)rawliteral";

constexpr char * webpage_ok = R"rawliteral(
<!DOCTYPE html>
<html lang="en">
 <head>
  <meta charset="utf-8">
  <title>ESP32 Dali Clock</title>
  <meta name="viewport" content="width=device-width, initial-scale=1">
 </head>
 <body>
  <h1>ESP32 Dali Clock</h1>
  <p>Configuration accepted!</p><br>
  <form>
   <input type="button" value="Okay" >
  </form>
 </body>
</html>
)rawliteral";

void wifi_start() {
 xTaskCreatePinnedToCore(wifi_task, "wifi_task", 3*1024, NULL, 0, NULL, 0);
}

bool connectToWirelessAccessPoint() {
 // Read the configuration file if it exists

 if(!SPIFFS.begin(true)) return false;
 if(!config.load()) return false;
 theme.setTheme(config.theme_id);
 if(config.net_ssid.length() == 0) return false;
 info.set("Connecting to " + config.net_ssid + "...");
 WiFi.begin(config.net_ssid.c_str(), config.net_pass.c_str());
 const uint32_t start = millis();
 while (WiFi.status() != WL_CONNECTED) {
  delay(500);
  if(millis() - start > wifiTimeout) return false;
 }
 info.set("Getting time from " + config.ntp_addr + "...");
 Serial.print("Timezone is ");
 Serial.print(config.timezone);
 String tz = getTzByLocation(config.timezone);
 Serial.print(". Setting TZ to ");
 Serial.print(tz);
 Serial.println();
 configTimeWithTz(tz, config.ntp_addr);
 delay(1000);
 return true;
}

bool becomeWirelessAccessPoint() {
 info.set(String("Starting access point \"") + ap_ssid + "\"");
 WiFi.mode(WIFI_AP);
 WiFi.softAP(ap_ssid);
 delay(100);
 Serial.println(String("Running AP at " ) + ap_ssid + " with IP address " + WiFi.softAPIP().toString());
 dnsServer.start(53, "*", WiFi.softAPIP());
 return true;
}

void wifi_task(void* arg) {
 // Either join an AP or become an AP
 if(connectToWirelessAccessPoint() || becomeWirelessAccessPoint()) {
  if (WiFi.getMode() == WIFI_AP)
   info.set(String("Join \"") + ap_ssid + "\" and then go to\nhttp://" + WiFi.softAPIP().toString() + " to configure");
  else
   info.set(String("Go to http://") + WiFi.localIP().toString() + " to reconfigure");

  // Start web server
  server.on("/config_prefs", HTTP_GET, [](){
   server.send(200, "text/html", webpage_ok);
   config.set("theme_id", server.arg("theme_id"));
   config.save();
   theme.setTheme(config.theme_id);
  });
  server.on("/config_wifi", HTTP_GET, [](){
   server.send(200, "text/html", webpage_ok);
   if(server.arg("net_ssid") != "") {
    config.set("net_ssid", server.arg("net_ssid"));
    config.set("net_pass", server.arg("net_pass"));
   } else {
    config.set("net_ssid", "");
    config.set("net_pass", "");
   }
   config.set("ntp_addr", server.arg("ntp_addr"));
   config.set("time_dst", server.arg("time_dst"));
   config.set("timezone", server.arg("timezone"));
   config.save();
   info.set("Rebooting...");
   delay(2000);
   ESP.restart();
  });
  server.on("/config_time", HTTP_GET, [](){
   server.send(200, "text/html", webpage_ok);
   String str = server.arg("datetime-local");
   dali.set_date(str.substring( 5, 7).toInt(), str.substring( 8,10).toInt(), str.substring( 0, 4).toInt());
   dali.set_time(str.substring(11,13).toInt(), str.substring(14,16).toInt(), str.substring(17,19).toInt());
   config.set("mil_time", server.arg("mil_time"));
  });
  server.on("/timezones", HTTP_GET, [](){
   String separator = "";
   String prefix = server.arg("prefix");
   String buff = "[\"";
   // Use chunked send otherwise we run out of memory
   server.setContentLength(CONTENT_LENGTH_UNKNOWN);
   server.send(200, "text/html");
   for(int i = 0;;) {
    const char *location = getLocation(i, prefix.c_str());
    if(!location) break;
    buff += separator + location;
    separator = "\",\n\"";
    if(buff.length() > 100) {
     server.sendContent(buff);
     buff = "";
    }
   }
   buff += "\"]";
   server.sendContent(buff);
  });
  server.onNotFound([](){
   Serial.print("Request for ");
   Serial.println(server.uri());
   server.send(200, "text/html", webpage);
  });
  server.begin();
  while(1) {
   dnsServer.processNextRequest();
   server.handleClient();
   delay(2);//allow the cpu to switch to other tasks
  }
 }
 vTaskDelete( NULL );
}
Step 6: Soldering the ESP32:
The soldering work in this project is the absolute minimal.
In the case of my CRT display pin 1 is V+ this gets soldered onto the VIN of the ESP32, pin 2&3 is ground and gets soldered onto one of the GND points and pin 4 is the composite input and this gets soldered onto GPIO 25 of the ESP32.
That's it!
Step 7: Test the Code and Configure:
Now that the code is uploaded to the ESP32 and we have the 4 pins soldered its time to test out the code and configure our WIFI information.
CAUTION! OPEN HIGH VOLTAGE!
- When your ESP32 is plugged into a USB port you will notice your CRT display turn on and display the clock.
- Go onto your phone/laptop/desktop and connect to ESP32 Dali Clock
- A web page will now open with ways to configure your clock
- Simply fill in your home WIFI network name and password and click submit
- The clock will restart and automatically update the time and date
- To return to the configurator in the future simply turn off your home WIFI and repeat the steps above
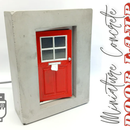
Step 8: The Enclosure:
With our ESP32 coded and electronic components in hand we can now focus on making an enclosure for the clock.
I jumped onto Fusion 360 and started designing, as the CRT display is so tiny I wanted the enclosure to be as compact as possible so that it does not look out of proportion. I tried to add some art deco styling to the enclosure to go with the retro components and also made a holder for the magnifying glass to enlarge the display a bit and just to add to the cool factor!
To print the enclosure I used my resin printer with clear resin for the main enclosure and some black resin for the lens holder and base.
Mini CRT ESP32 Clock


Step 9: Refine the Enclosure:
As the clear resin prints need a coat of clear lacquer to be transparent I decided to go ahead an paint the entire enclosure...and I was a bit aggressive with the support removal so I needed to do the ombre effect to hide a small crack...
I simply wet sanded all the printed parts with some 400 grit sanding paper then sprayed the transparent part with clear lacquer followed by satin black on the lens funnel and base.
TIP: To combat the yellow that you get with most "clear" UV resins simply add a drop of blue tint to your clear lacquer.
Step 10: Assembly:
Finally it's time to assemble your clock.
We start with the CRT display, the tube goes in first through the bottom with the screen coming through the hole at the top.
The driver board has a slot in the front side of the enclosure that it slides into first and then the back clips into place as pictured by the orange piece below.
With the CRT and driver board in place we can press the ESP32 into the bottom enclosure, there are two 2.5mm screw posts next to the USB port if your board is loose.
Next I placed a very small amount of clear glue around the top of the CRT tube where the lens funnel slides over before placing it on. When the glue has dried you can glue the lens funnel in place onto the enclosure and insert your magnifying glass.
The bottom of the enclosure simply snaps into place with clips on either side.
Finally to finish the enclosure off I used a chrome marker to paint my embossed logo on the front of the enclosure.
Step 11: Enjoy!
I hope you guys find this Instructable useful and if you have any questions please feel free to leave me a message or comment bellow.
Thank you for taking the time to read through my project and as always..
Happy making!


