How to use Tailwind CSS with Django ?
Last Updated :
15 Jan, 2024
Tailwind CSS has gained immense popularity among developers for its utility-first approach to styling web applications. Django on the other hand is a robust and flexible web framework written in Python. Combining these two powerful tools can enhance your Django projects. In this article, we will explore how to integrate the capabilities of Tailwind CSS within a Django project.
Tailwind CSS is basically a Utility-first CSS framework for building rapid custom UI. It is a highly customizable, low-level CSS framework that gives you all of the building blocks that you need. Also, it is a cool way to write inline styling and achieve an awesome interface without writing a single line of your own CSS.
Python Django is a web framework that is used to create web applications very efficiently and quickly. Django is called a battery-included framework because it contains a lot of built-in features such as Django Admin Interface, default database – SQLite3, etc. Django provides various ready-made components such as a way to handle user authentication, a management panel for your website, forms, a way to upload files, etc.
Steps to use Tailwind CSS with Django
Step 1: Install Django package: Install the Django package via the following command.
python -m pip install Django
Step 2: Create a Django project: Create a Django project via the following command and name your Project whatever you want. Here my Project name is “myapp”.
django-admin startproject myapp
Step 3: Go inside myapp folder: We need to get inside the created folder to create other files.
cd myapp
Step 4: Create a new “templates/" directory inside the project folder and update “settings.py" folder.
Python
TEMPLATES = [
{
'BACKEND': 'django.template.backends.django.DjangoTemplates',
'DIRS': [BASE_DIR / 'templates'],
'APP_DIRS': True,
'OPTIONS': {
'context_processors': [
'django.template.context_processors.debug',
'django.template.context_processors.request',
'django.contrib.auth.context_processors.auth',
'django.contrib.messages.context_processors.messages',
],
},
},
]
|
Step 5: Install Django-compressor by running the following command in your terminal.
python -m pip install django-compressor
Step 6: Add compressor to the installed apps inside the “settings.py" file.
Python
INSTALLED_APPS = [
'django.contrib.admin',
'django.contrib.auth',
'django.contrib.contenttypes',
'django.contrib.sessions',
'django.contrib.messages',
'django.contrib.staticfiles',
'compressor',
]
|
Step 7: Configure the compressor inside the “settings.py" file.
Python
COMPRESS_ROOT = BASE_DIR / 'static'
COMPRESS_ENABLED = True
STATICFILES_FINDERS = ('compressor.finders.CompressorFinder',)
|
Step 8: Create two new folders “static/src” and an input.css file inside those folders.

Step 9: Create a new “views.py" file inside “myapp/" next to urls.py and add the following content.
Python
from django.shortcuts import render
def index(request):
return render(request, 'index.html')
|
Step 10: Import the newly created view instance inside the “urls.py" file by adding the following code.
Python
from .views import index
urlpatterns = [
path('admin/', admin.site.urls),
path('', index, name='index')
]
|
Step 11: Create a new “_base.html" file inside the templates directory and write the following code inside it. It’s a template file that serves as a base or layout for other HTML files in your application.
HTML
{% load compress %}
{% load static %}
<!DOCTYPE html>
<html lang="en">
<head>
<meta charset="UTF-8">
<meta http-equiv="X-UA-Compatible" content="IE=edge">
<meta name="viewport" content=
"width=device-width, initial-scale=1.0">
<title>Django + Tailwind CSS</title>
{% compress css %}
<link rel="stylesheet"
href="{% static 'src/output.css' %}">
{% endcompress %}
</head>
<body class="bg-green-50">
<div class="container mx-auto mt-4">
{% block content %}
{% endblock content %}
</div>
</body>
</html>
|
Step 12: Create an “index.html" file: This will serve as the homepage.
Step 13: Now install Tailwind CSS: Run the following command on the terminal to install all the tailwind dependencies.
npm install -D tailwindcss
Step 14: Initialize the tailwind: The below command will generate a config file named “tailwind.config.js”.
npx tailwindcss init
Step 15: Configure your tailwind.config.js: To do that go inside “tailwind.config.js” and update it as given below.
Javascript
module.exports = {
content: [
'./templates/**/*.html'
],
theme: {
extend: {},
},
plugins: [],
}
|
Step 16: Import the Tailwind CSS directives: Add the layer directives of tailwind CSS by writing the following code inside “input.css”.
CSS
@tailwind base;
@tailwind components;
@tailwind utilities;
|
Step 17: Compile the Tailwind CSS code: Run the following command on the terminal to compile the Tailwind CSS directives from “input.css” into CSS code in “output.css”
npx tailwindcss -i ./static/src/input.css -o ./static/src/output.css
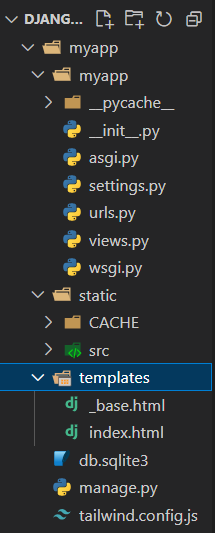
Step 18: Check the Project Structure
Step 19: Run the application: To run the application, use the command “python manage.py runserver” in the terminal.
python manage.py runserver
The above line of code will generate a localhost server & follow the server link to open the application on the web browser.
Step 20: Test Tailwind CSS with an example: Now that we have successfully set up the tailwind CSS and understand how to run the application, now, we will test with a simple example.
Example: Write the code inside “index.html”
HTML
{% extends "_base.html" %}
{% block content %}
<h1 class="text-3xl text-green-800">
GeeksforGeeks
</h1>
<h3 class="text-3x1 text-green-800">
GeeksforGeeks
</h3>
{% endblock content %}
|
Output:

Please Login to comment...